centos开机自启动配置方式汇总
一、Centos上配置开机自启动的几种方式
二、实践演示
1、在/etc/rc.d/rc.local中添加服务启动命令
/etc/rc.d/rc.local脚本会在Centos系统启动时被自动执行,所以可以把需要开机后执行的命令直接放在这里。
示例:配置开机启动apollo
vi /etc/rc.d/rc.local1

想简单点可以像上面这样直接将服务的启动命令添加到/etc/rc.d/rc.local中。
也可以自己编写服务启动的脚本。由于重启时是以root用户重启,需要保证root用户有脚本执行权限。
1)、编写服务启动的脚本
vi /opt/script/autostart.sh
#!/bin/bash/root/Downloads/docker-quick-start/docker-compose up -d12
2)、赋予脚本可执行权限(/opt/script/autostart.sh是你的脚本路径)
chmod +x /opt/script/autostart.sh1
3)、打开/etc/rc.d/rc.local文件,在末尾增加如下内容
/opt/script/autostart.sh1
3)、在centos7中,/etc/rc.d/rc.local的权限被降低了,所以需要执行如下命令赋予其可执行权限
chmod +x /etc/rc.d/rc.local1
2、通过chkconfig配置
在CentOS7之前,可以通过chkconfig来配置开机自启动服务。
chkconfig相关命令:
chkconfig –-add xxx //把服务添加到chkconfig列表chkconfig --del xxx //把服务从chkconfig列表中删除chkconfig xxx on //开启开机自动启动chkconfig xxx off //关闭开机自动启动chkconfig --list //查看所有chklist中服务chkconfig --list xxx 查看指定服务123456
chkconfig运行级别level和启动顺序的概念:
chkconfig --list

这里的0到6其实指的就是服务的level。
–level<等级代号> 指定系统服务要在哪一个执行等级中开启或关毕。
等级0表示:表示关机
等级1表示:单用户模式
等级2表示:无网络连接的多用户命令行模式
等级3表示:有网络连接的多用户命令行模式
等级4表示:不可用
等级5表示:带图形界面的多用户模式
等级6表示:重新启动
比如如下命令:
//设定mysqld在等级3和5为开机运行服务chkconfig --level 35 mysqld on

//设置network服务开机自启动,会把2~5的等级都设置为onchkconfig network on12345
表示开机启动配置成功。
服务的启动顺序又指的什么呢?
服务的启动顺序是指在服务器启动后服务启动脚本执行的顺序。
以系统默认服务network说明:
cat /etc/init.d/network1

其中
# chkconfig: 2345 10 90
用来指定服务在各个level下的启动顺序。
该配置的含义是network服务在2、3、4、5的level下的启动顺序是10,在1和6的level等级下的启动顺序是90。
chkconfig配置的服务启动顺序最后都会在
/etc/rc.d/
目录下体现出来:
cd /etc/rc.d/1

文件中脚本命名规则,首字母K表示关闭脚本,首字母S表示启用脚本,数字表示启动的顺序.
chkconfig配置实例
通常kibana的官方配置是没有介绍如何配置开机自启动的。这里我配置kibana开机自启动来说明。
1、在/etc/init.d目录下,新建脚本kibana
cd /etc/init.d
vi kibana12
脚本内容如下:
#!/bin/bash# chkconfig: 2345 98 02# description:  kibanaKIBANA_HOME=/usr/local/kibana-6.2.4-linux-x86_64case $1 in
 start)
         $KIBANA_HOME/bin/kibana &
         echo "kibana start"
         ;;
 stop)
    kibana_pid_str=`netstat -tlnp |grep 5601 | awk '{print $7}'`
    kibana_pid=`echo ${kibana_pid_str%%/*}`
    kill -9 $kibana_pid
    echo "kibana stopped"
    ;;
 restart)
    kibana_pid_str=`netstat -tlnp |grep 5601 | awk '{print $7}'`
    kibana_pid=${kibana_pid_str%%/*}
    kibana_pid=`echo ${kibana_pid_str%%/*}`
    kill -9 $kibana_pid
    echo "kibana stopped"

    $KIBANA_HOME/bin/kibana &
    echo "kibana start"
    ;;
 status)
    kibana_pid_str=`netstat -tlnp |grep 5601 | awk '{print $7}'`
    if test -z $kibana_pid_str; then
       echo "kibana is stopped"
    else
       pid=`echo ${kibana_pid_str%%/*}`
       echo "kibana is started,pid:"${pid}
    fi
    ;;*)
    echo "start|stop|restart|status"
    ;;esac12345678910111213141516171819202122232425262728293031323334353637383940
注意⚠️:
每个被chkconfig管理的服务需要在对应的init.d下的脚本加上两行或者更多行的注释。
第一行告诉chkconfig缺省启动的运行级以及启动和停止的优先级。如果某服务缺省不在任何运行级启动,那么使用 - 代替运行级。
第二行对服务进行描述,可以用\ 跨行注释。
#!/bin/bash#chkconfig:2345 98 02#description:kibana123
解释说明:
配置kibana服务在2、3、4、5的level等级下脚本执行顺序是98,
1、6的level等级下脚本执行顺序是01。
2、增加脚本的可执行权限
chmod +x kibana1
3、查看chkconfig list
chkconfig --list 1
4、把服务添加到chkconfig列表
chkconfig --add kibana1

5、设置kibana服务自启动
chkconfig kibana on //开启开机自动启动1
6、查看kibana服务自启动状态
chkconfig --list kibana1
如果2~5都是on,就表明会自动启动了

7、服务的启动、停止、重启和状态查看
//查看服务状态service kibana status
//服务启动service kibana start
//服务停止service kibana stop
//服务重启service kibana restart12345678

3、Centos7通过systemctl enble配置服务自启动
在Centos7后,更推荐通过
systemctl
来控制服务。
| 任务 | 旧指令 | 新指令 |
|---|---|---|
| 使某服务自动启动 | Chkconfig --level 3 httpd on | systemctl enable httpd.service |
| 使某服务不自动启动 | chkconfig --level 3 httpd off | systemctl disable httpd.service |
| 检查服务状态 | service httpd status | systemctl status httpd.service (服务详细信息) systemctl is-active httpd.service(仅显示是否Active) |
| 显示所有已启动的服务 | chkconfig --list | systemctl list-unit-files systemctl list-units --type=service |
| 启动某服务 | service httpd start | systemctl start httpd.service |
| 停止某服务 | service httpd stop | systemctl stop httpd.service |
| 重启某服务 | service httpd restart | systemctl restart httpd.service |
1、systemctl服务的目录介绍
知道服务的管理是通过 systemd,而 systemd 的配置文件大部分放置于
/usr/lib/systemd/
目录内。但是 Red Hat 官方文件指出, 该目录的文件主要是原本软件所提供的设置,建议不要修改!而要修改的位置应该放置于
/etc/systemd/system/
目录内。
详情查看:https://wizardforcel.gitbooks.io/vbird-linux-basic-4e/content/150.html
Centos 系统服务脚本目录:
/usr/lib/systemd/1
有系统(system)和用户(user)之分,如需要开机没有登陆情况下就能运行的程序,存在系统服务(system)里,即:
/usr/lib/systemd/system/1
反之,用户登录后才能运行的程序,存在用户(user)里,服务以.service结尾。
/usr/lib/systemd/user/1
2、建立kibana开机服务
1)、建立kibana服务文件
cd /etc/systemd/system/vim kibana.service12
脚本内容:
[Unit]    Description=kibana
After=network.target
[Service]    Type=forking
User=rootGroup=rootExecStart=/etc/init.d/kibana start
ExecReload=/etc/init.d/kibana restart
ExecStop=/etc/init.d/kibana  stop
PrivateTmp=true
[Install]    WantedBy=multi-user.target
12345678910111213
注意⚠️:
这里
ExecStart、ExecReload、ExecStop
的命令还是借助了上文在/etc/init.d目录下配置kibana脚本来实现。
[Service]的启动、重启、停止命令全部要求使用绝对路径
[Install]服务安装的相关设置,可设置为多用户
参数说明:
Description:描述服务
After:描述服务类别
[Service]服务运行参数的设置
Type=forking是后台运行的形式
User 服务启动用户
Group 服务启动用户组
ExecStart 为服务的具体运行命令
ExecReload 为重启命令
ExecStop 为停止命令
PrivateTmp=True表示给服务分配独立的临时空间
2)、赋予执行权限
chmod 754 kibana.service1
依照上面的表格,权限组合就是对应权限值求和,如下:
7 = 4 + 2 + 1 读写运行权限
5 = 4 + 1 读和运行权限
4 = 4 只读权限.
这句命令的意思是将filename文件的读写运行权限赋予文件所有者,把读和运行的权限赋予群组用户,把读的权限赋予其他用户。
3)、服务的启动、停止、开机启动
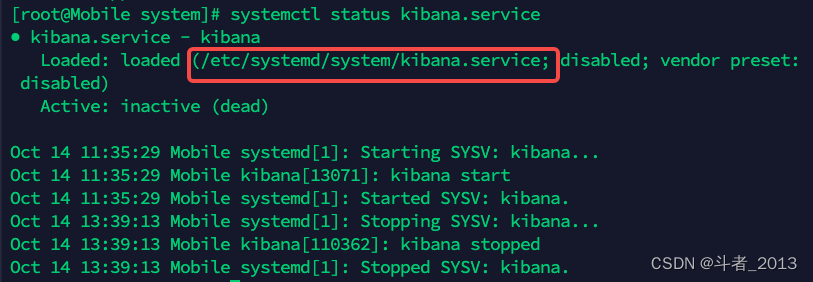
//重新加载某个服务的配置文件,如果新安装了一个服务,归属于 systemctl 管理,要是新服务的服务程序配置文件生效,需重新加载systemctl daemon-reload//查看服务状态systemctl status kibana.service1234

systemctl enable kibana.service1
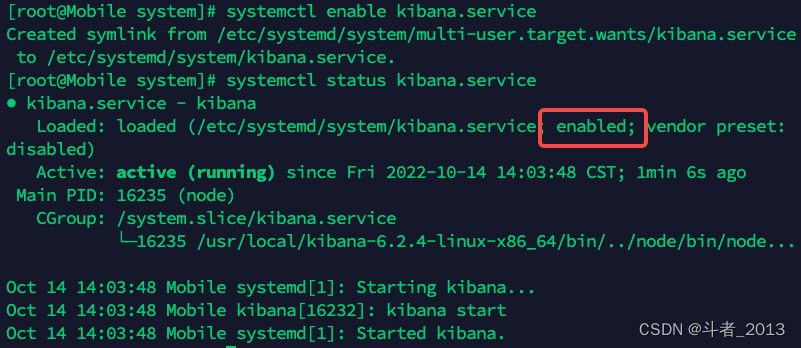
服务状态说明:
systemctl status 服务名称
| 状态 | 说明 |
|---|---|
| loaded | 系统服务已经初始化完成,加载过配置 |
| active(running) | 正有一个或多个程序正在系统中执行, vsftpd就是这种模式 |
| atcive(exited) | 仅执行一次就正常结束的服务, 目前并没有任何程序在系统中执行 |
| atcive(waiting) | 正在执行当中,不过还再等待其他的事件才能继续处理 |
| inactive | 服务关闭 |
| enbaled | 服务开机启动 |
| disabled | 服务开机不自启 |
| static | 服务开机启动项不可被管理 |
| failed | 系统配置错误 |
常用服务文件
1.nginx.service
[Unit]Description=nginx - high performance web serverAfter=network.target remote-fs.target nss-lookup.target[Service]Type=forkingExecStart=/usr/local/nginx/sbin/nginx -c /usr/local/nginx/conf/nginx.confExecReload=/usr/local/nginx/sbin/nginx -s reloadExecStop=/usr/local/nginx/sbin/nginx -s stop[Install]WantedBy=multi-user.target1234567891011
2.mysql.service
[Unit]Description=mysqlAfter=network.target remote-fs.target nss-lookup.target[Service]Type=forkingExecStart=/usr/local/mysql/support-files/mysql.server start#ExecReload=/usr/local/mysql/support-files/mysql.server restart#ExecStop=/usr/local/mysql/support-files/mysql.server stop#PrivateTmp=true[Install]WantedBy=multi-user.target12345678910111213
4.redis.service
[Unit]Description=RedisAfter=network.target remote-fs.target nss-lookup.target[Service]Type=forkingExecStart=/usr/local/bin/redis-server /etc/redis.confExecStop=kill -INT `cat /tmp/redis.pid`User=wwwGroup=www[Install]WantedBy=multi-user.target12345678910111213
5.supervisord.service
[Unit]Description=Process Monitoring and Control DaemonAfter=rc-local.service[Service]Type=forkingExecStart=/usr/bin/supervisord -c /etc/supervisord.confSysVStartPriority=99[Install]WantedBy=multi-user.target1234567891011
总结
本文主要总结了Centos上配置开机自启动的3种方式
【版权声明】
本站部分内容来源于互联网,本站不拥有所有权,不承担相关法律责任。如果发现本站有侵权的内容,欢迎发送邮件至masing@13sy.com 举报,并提供相关证据,一经查实,本站将立刻删除涉嫌侵权内容。
下一篇:常见的四大全文搜索引擎