docker nginx1.7.6+keepalived实现双机热备
0.前提条件
环境两台ubuntu版本14.04 64位系统(并获取root权限)

假设两台服务器ip为:172.16.34.214(master),172.16.34.215(backup),keepalived的虚拟ip为172.16.34.216
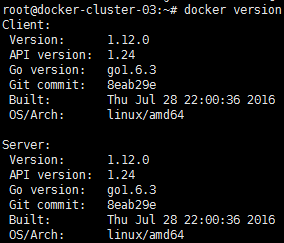
两台ubuntu系统上装好docker,版本如下
1.运行docker的nginx1.7.6镜像实例
拉取基于官方的nginx1.7.6镜像
#docker pull nginx:1.7.6
新建nginx测试页面(同样在另外一台机子上就不重复了,记得改ip)
#mkdir -p /tmp/docker
#echo "<h2 >This is nginx official container running on 172.16.34.214 </h2><br /> static files:/tmp/docker/index.html" > /tmp/docker/index.html
运行docker实例
#docker run --name nginx_m --restart=always -v /tmp/docker:/usr/share/nginx/html:ro -p 80:80 -d nginx:1.7.6
(注:--restart=always是指在docker服务重启后,该容器服务也会自动重启)
2.宿主机安装配置keepalived
#apt-get clean && apt-get update
#apt-get install -y libssl-dev openssl libpopt-dev
#apt-get install -y keepalived
#cp /usr/share/doc/keepalived/samples/keepalived.conf.sample /etc/keepalived/keepalived.conf
#vim /etc/keepalived/keepalived.conf
master主机如下配置 backup如下配置
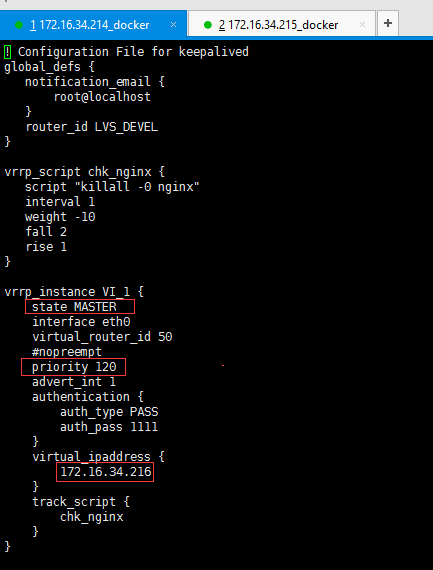
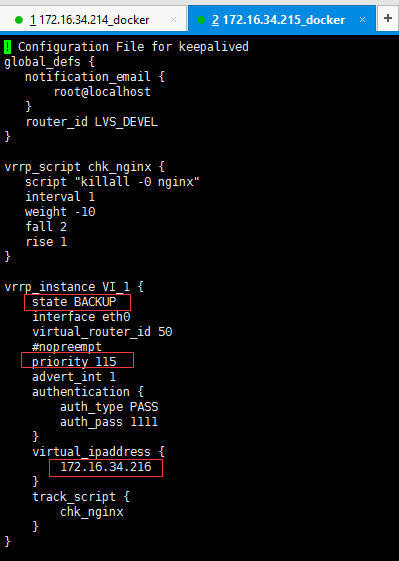
启动keepalived服务
#service keepalived start[stop,restart]

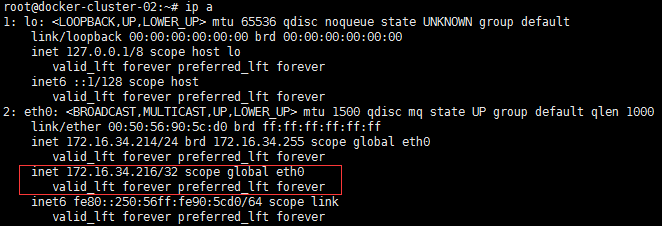
在master机器上面查看虚拟是否绑定上了
3.验证双活效果
访问172.16.34.214主机:

访问172.16.34.215主机:

访问172.16.34.216虚拟ip:

可以看出此时master主机nginx运行正常
把master主机ngxin服务停止
#docker stop nginx_m

在215机子查看ip绑定
#ip a

可以看到虚拟ip迁移至备份机器了,说明我们配置成功!
访问网页


再把master主机nginx恢复回来
#docker start nginx_m

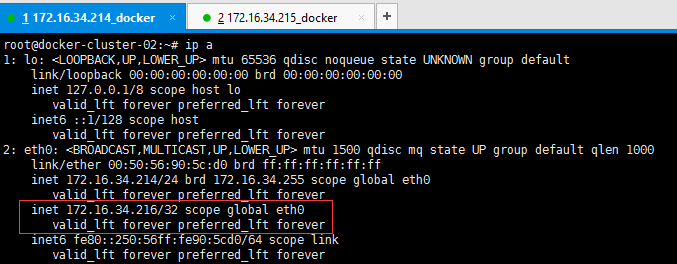
在214机子查看ip绑定
#ip a
访问网页

【版权声明】
本站部分内容来源于互联网,本站不拥有所有权,不承担相关法律责任。如果发现本站有侵权的内容,欢迎发送邮件至masing@13sy.com 举报,并提供相关证据,一经查实,本站将立刻删除涉嫌侵权内容。
